GARAGE AND OPEN WALLS PROJECT GUIDE


DETERMINE YOUR GOALS
The first step in any successful project is making sure you know what you are setting out to accomplish. For open walls, there’s not much to consider other than your targeted R value, which will determine your spray thickness. For sheds and garages where you may be looking to just air seal and tighten up, an inch might suffice. If you are temperature controlling a living space, we’d recommend two or three inches. For projects that will be inspected and have to pass code, we defer to what your local municipality requires. Closed cell Foam it Green has a very high R value at approx. 7 per inch.
DO THE MATH
Your total required number of spray foam kits is determined by your total board feet need. A board-foot is one squared foot at one inch thick. Let’s assume you are spraying your walls to a thickness of two inches. Total up the surface area (length X height) of the walls you will be spraying, and multiply it by 2” to get your total board feet. Take your total board-feet need of the walls, and then add about 10% or so for waste. Divide your total board-feet need by 600 (the board-feet a Foam it Green 602 kit can cover), round it up to the next whole kit, and place your order!
PREPARE FOR SUCCESS
It’s difficult if not impossible to get foam off of surfaces it hits. So, be sure to take the time to cover anything you do not want foam stuck to including floors, windows, equipment in the area, and even you once you start spraying! Along with the recommended PPE, the sprayer should have no exposed skin or hair during application. How do you get foam out of a beard? In a word, scissors. The components throughout the tanks need to be between 65-85F degrees to expel material at the right rate. As always, make sure your target spray surfaces measure between 65F-85F. 75F is ideal for material and surface temperature.
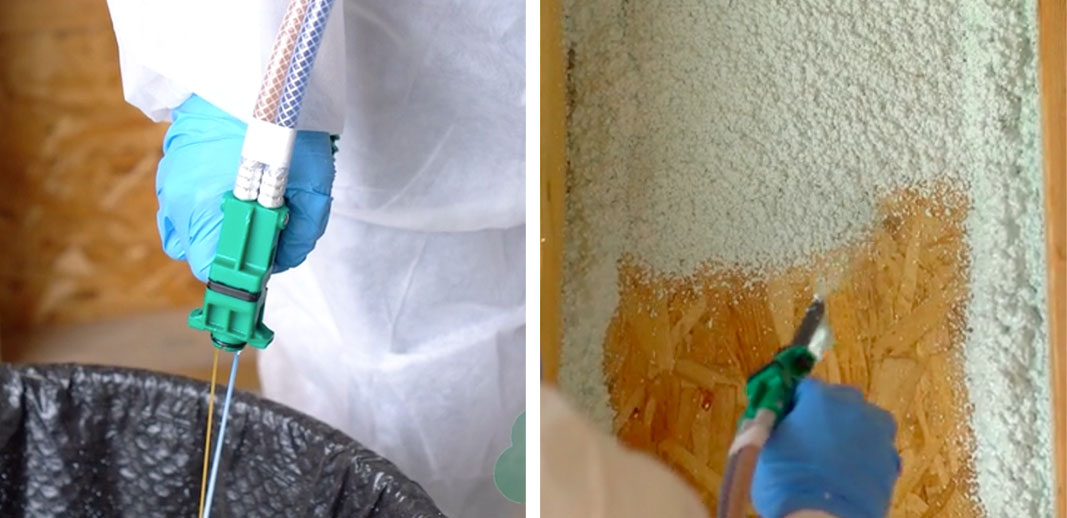
TECHNIQUE TIPS
Target a wet foam application thickness of 1/3” as that will expand to one inch cured. Whether to use the extra green fan spray tip or not is a matter of personal preference. Usually, it’s best to “box out” the wall cavity by spraying where the corners of the studs meet the substrate. From there, work either vertically if using the fan spray tip or side to side when using just the black mixing nozzle alone. You won’t be able to get the foam perfectly flat, but how it looks isn’t as critical as just making sure you aren’t missing any spots. If you are spraying more than one inch in total, do not attempt to achieve that thickness in a single pass. Instead, spray one third of an inch, let it rise in 30 seconds and cure in 5 minutes, and then do it again for a second inch.
SPECIAL NOTES ABOUT GARAGES AND OPEN WALLS
The narrow gaps holding shims around windows and doors should be air sealed with canned, open cell foam, as its expansion strength will not put too much pressure on those framing members. Save the stronger closed cell foam for the open wall cavities between studs. If you are only looking to spray two or three inches of closed cell foam into a wall, there is no need to cover it with additional insulation, more foam or otherwise, before closing up the wall. It is ok to have that empty space in the wall before installing drywall or sheetrock. In fact, unless your code dictates it, there is no need for a vapor barrier over the foam either. The vast majority of vapor permeance happens through air movement, not direct diffusion. So, since the foam is stopping that air movement, from a building science perspective, you are good to go. Again, if your local inspector says you need one, then you need to put one in. Lastly, keep the foam out of electrical boxes. Some people have good luck taping off the insides before spraying, and then pulling the tape afterwards.
Recommended product for open wall projects

Foam it Green® STANDARD
Closed Cell Spray Foam
For most insulation projects, e.g., open walls, attics, basement/crawlspaces etc. and fast expansion in any direction.
Foam it Green® Low-GWP formula can be shipped to all states, including CA, CO, HI, MA, MD, NJ, NY, RI, WA, VT.

Green Means Go
We have green indicator foam. Yellow-plus-blue-equals-green foam to be specific. That way you know you have the right mix the whole way through your project, minimizing waste. Green means go!
Better Gun Means Better Results
We have the best gun in the business. The face of the gun has been designed to have two, solid ear clips so the nozzles won’t fly off during spray. Many competitor guns have just a single clip at the top. All of Foam it Green’s guns are pressure tested before shipping out.

The Perfect Temperature
We have temperature strips on the tanks to help you know the kit is up to temp and ready to be sprayed. Improper tank temperature is the #1 cause of off-ratio spraying.

Keep The Foam Flowing
You get a full 10 mixing nozzles with each Foam it Green 602. You may have extra, and that’s ok! It’s a lot better than running short and shutting down the project to wait for more.

Anti-Microbial
Our fast rise, closed cell foam is ASTM G21 Anti-Microbial, adding mold stopping power to your project.
